Technology Resources
Programming the micro:bit with MakeCode
Programming a microcontroller is intimidating, especially if you have never done any coding before. An easy way to get started is by using a block programming tool.
What is a Block Programming Tool?
Block programming tools are also called visual programming tools. They let you create progams using pictures of code elements that look like puzzle pieces. If code elements can work together, their puzzle pieces will fit together. This takes away the need to learn how to use a programming language while learning the basics of logic that are necessary to programming. The block programming tool we will use is called Makecode and it was developed by Microsoft.
Getting Started with MakeCode
Go to makecode.com. You should see the following:

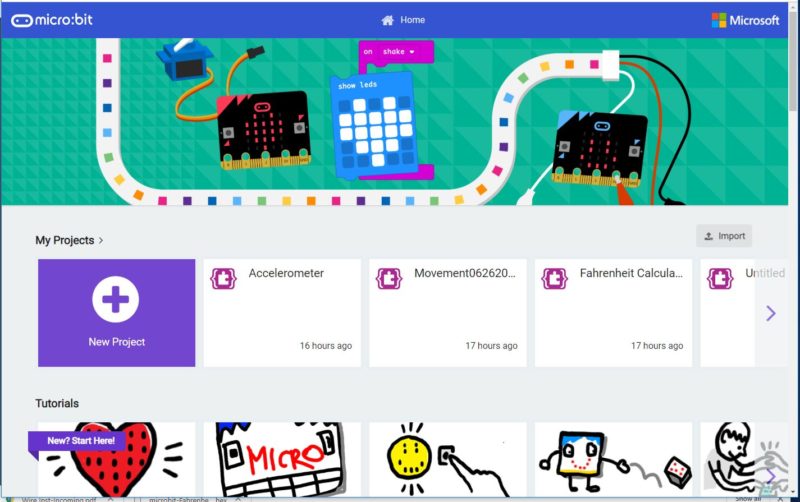
Click on the picture of the micro:bit on the top left. This will open up another page that gives you the option of creating new projects, edit existing projects, or looking at some tutorials. For now, click on the New Project link:
This will take you to a screen that looks like this:

Elements of the micro:bit Coding Page
The right side of the screen is where you will build your code. When you open a new project, there will be two code blocks already in there. :
- ‘on start’ will run once after the micro:bit starts running the code
- ‘forever’ will run your code forever
To the left of that is a list of categories for code blocks. If you click on any of them, a list of available code blocks will show.
To the left of the list is a picture of a micro: bit. This is a computer model of a real micro:bit and it will simulate whatever code you create. If you code some behavior for a button, that behavior will occur when you press the onscreen button. If you attach a device to one of the connectors, a picture of the device will show.
There are several buttons underneath the micro:bit and here is what each does:
- Start/Stop – this will start or stop whatever script you have running. If you stop it and start it, it starts where it left off.
- Reload – this restarts the code you are running from the beginning.
- Snail – this runs the code more slowly.
- Speaker – this turns the sound off and on.
- Screen size – this gives you a full screen.
Directly below the micro:bit simulator is the Download button that you will use to transfer your code to the micro:bit. To the right of that is a field with the word ‘untitled’ in it. This is where you can assign a name to your code. Makecode will save your code and it will be available the next time you get into Makecode.
On the far bottom right, there are left-right arrows that allow you to back out of changes (left arrow) or reimplement changes that you had back out of.
To the right of the arrows are a ‘+’ and ‘-‘ that you can use to make the text bigger or smaller.
This is it for what is on the programming page. The next post will be a simple program to get started.